Configuration of System Connector
The System Connector is used to launch external applications using the context of the current page to define a URL string to execute
Examples of this may include:
- The launching of a GIS to spatially display the asset currently being viewed in Brightly Assetic. Typically URL templates for common GIS systems are listed in the article Launching GIS from Assetic
- The launching of a Document Management System to display documents associated with the asset or work request currently being viewed in Assetic.
The System Connector may be implemented for the following Brightly Assetic modules:
- Accounting
- Assessments
- Assets
- Components
- Documents
- Functional Locations
- Maintenance
- Simple Asset Groups
- Simple Assets
A Brightly Assetic system administrator configures the System Connector. There are two aspects to this:
- Defining the URL template
- Defining the context to apply to the URL template
URL Template
The URL template is configured as follows:
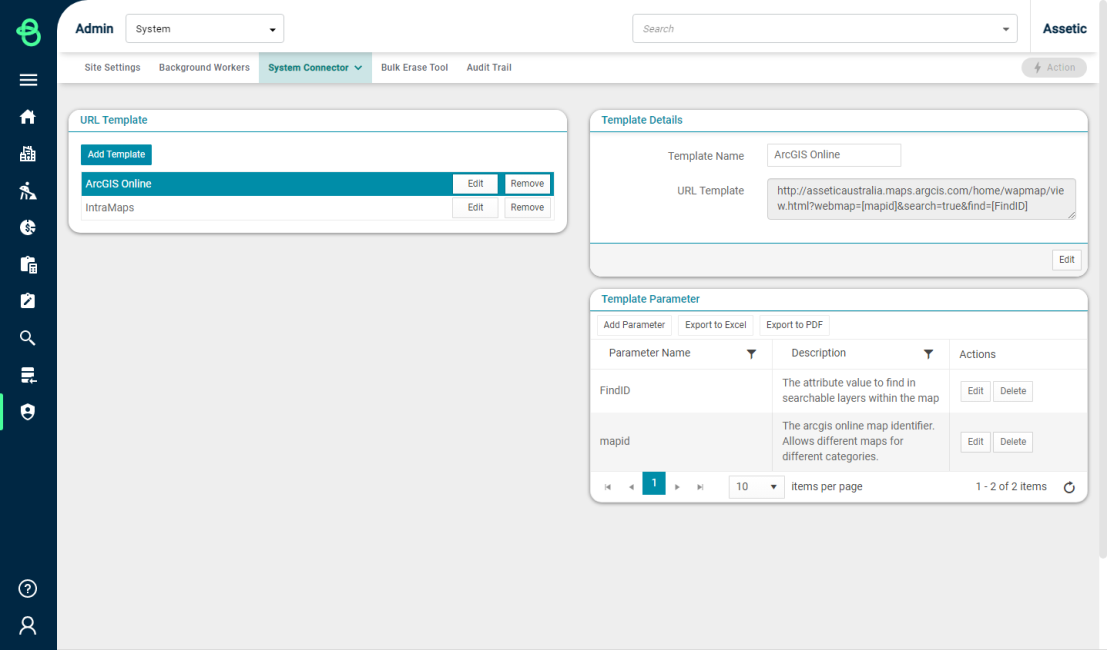
- Navigate to "Admin"->"System"->"System Connector"->"URL Template"
- Choose "Add Template" in the "URL Template" section
- Enter the name of the new template and Save. (This example will use "GeoCortex", since the URL is for the GeoCortex map viewer)
- Select (highlight) the newly created template
- In the "Template Details" section choose "Edit". This enables a URL to be entered. Sections within the URL that are contextual are coded with a keyword enclosed in square brackets. As an example the following URL requires the name of the GIS attribute search and the GIS Identifier (GIS ID). These two parameters have been defined by the keywords [Search] and [ExternalID]. The names used for the keywords can be anything, so choose keywords that describe the purpose of the field in the URL or how the field relates to Assetic fields.
http://mapi.site.com/SilverlightViewer/?Viewer=Public&AttributeSearch=[Search],GIS ID,[ExternalID]
- Save the URL by selecting "Update"
- Next choose "Add Parameter" in the "Template Parameter" section. This is where the keywords used in the URL are specified and given a description to make it easier to understand their use.
The template is now defined.
Context Configuration
The template is applied to the relevant Assetic asset categories and work tickets.
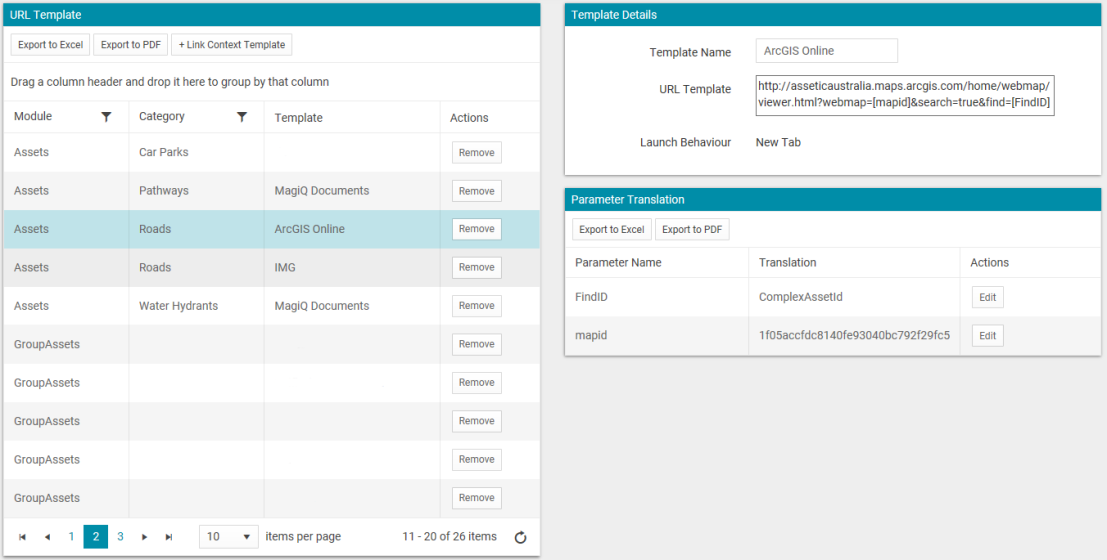
- Navigate to "Admin"->"System"->"System Connector"->"Context Configuration"
- In the "URL Template" section, select "+ Link Context Template" to add a new context
- Select a module for the context - in this example "Assets" will be chosen
- Select an asset category - in this example "Stormwater Drains" will be chosen
- Select the URL Template created earlier
- Finish by selecting "Link". The new context definition will show in the "URL Template" grid. Highlight the new context link.
- In the "Parameter Translation" section, the translation of Assetic fields or constants to the keywords defined in the URL Template takes place. Choose "Edit" for each parameter
- For each parameter choose where the value for the parameter is taken from an Assetic field, or is a constant. In this example the "FindID" parameter will translate to the Asset ID (translation type="Field"), and the "mapid" parameter will translate the map ID in ArcGIS conigured in the external GIS (translation type="Constant").
Launching External Application
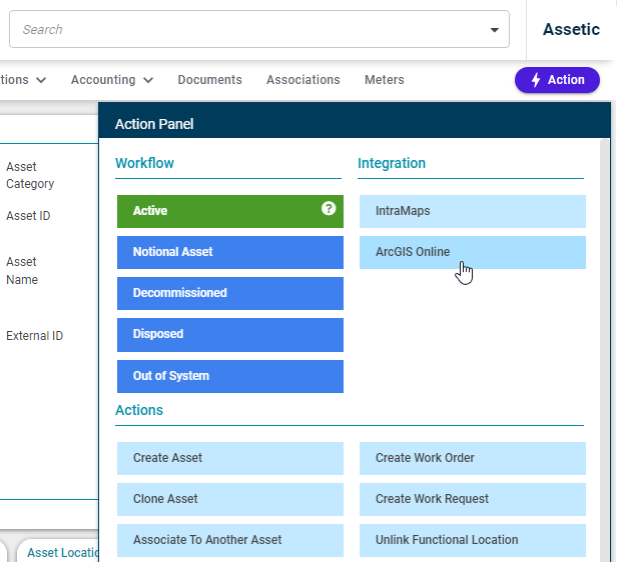
The configuration applied above will result in a new action being available when a user is viewing a Road asset.
The action is highlighted in the screenshot below. Clicking on it will launch the external GIS which will navigate to the currently viewed asset.
Note that the action is only available if viewing a Road asset, since this was the only context that was configured. Additional contexts for other asset categories may also be configured.